

The 3 most popular methods of installing Joomla at HostGator:
- Standard Joomla Installer (Default built-in installer, this page)
- QuickInstall (HostGator's custom one-click installer)
- Fantastico (cPanel one-click installer)
Standard Install -- This method is the default method that comes with the Joomla package. Upload the package (.zip) file then extract to the server. Then follow the installation procedure at yourdomain.com/installation. Continue below to learn more about this standard install method.
QuickInstall, HostGator's custom Joomla Installer -- HostGator has created an software install manager. You may find that their custom installer is better maintained then a 3rd party installer. Although there is little control when installing, it is a very robust system. Read our full install Joomla using Hostgator QuickInstall guide.
Fantastico cPanel 1-click installer -- This is a one-click installer that makes installing Joomla a breeze. Enter user information and this installer will create a database and database user for you. A great option for beginners. Read our full guide on installing Joomla using Fantastico.
If you find this install guide helpful, please return the favor by leaving a helpful and honest review for others to learn from. Leave a HostGator Review.
Before you begin, you will need:
- HostGator Account (Sign up)
- cPanel Username / Password
- DNS configured (Domain name pointed to HostGator Server)
Step 1: Download Joomla
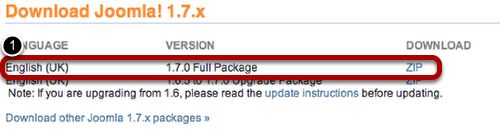
- Download the Joomla install 'full package' (.zip) The package is available here: http://Joomla.org/download
Step 2: Login to your cPanel at HostGator
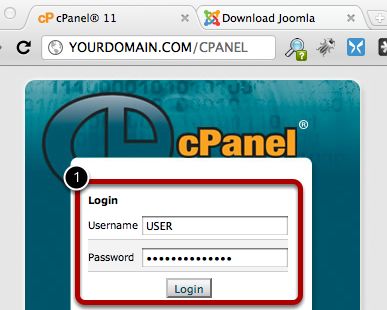
- Go to http://YOURDOMAIN.COM/CPANEL and login with your cPanel Username and Password.
Step 3: Go to File Manager
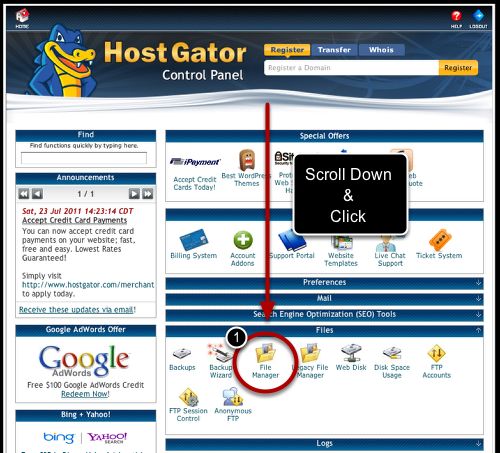
- Click "File Manager" which is under the "Files" section (Select "Web Root" in the dialogue box).
Step 4: Use "File Manager" to upload Joomla Package

- Verify you are in the "public_html" folder (This is the top level folder).
- Click Upload. In the upload window, click 'Choose File' or 'Browse'. Select the Joomla Install Package (The '.ZIP' Joomla package) that was downloaded from Joomla.org, and click 'Open'. (Not Pictured)
- Highlight uploaded Joomla Package (back in the File Manager after using the upload window).
- Click ‘Extract’ (There should not be ANY files EXCEPT the ‘cgi bin’ folder in the directory you install to. Some files will mess up Joomla). *Optional - You can also upload the .Zip of Joomla already extracted via FTP. We recommend Filezilla FTP client for this.
Step 5: Go to MySQL Database Creation Screen

- Click on ‘MySQL Databases’ after scrolling down to the "Databases" section in the main cPanel menu.
Step 6: Create MySQL Database and User
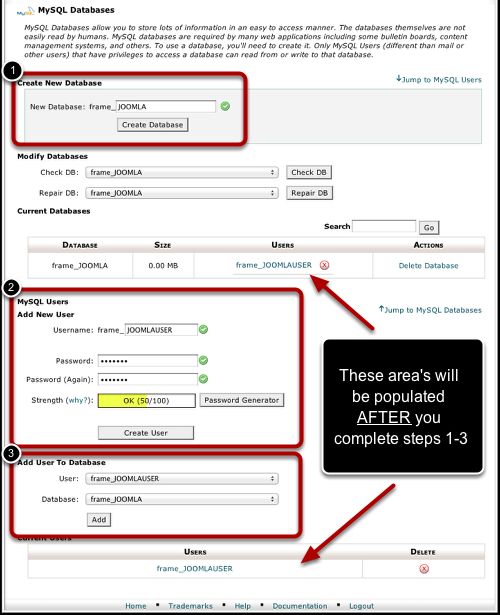
- Create a New Database by entering 3-4 (Where we have x’s in the example) characters where it says ‘New Database: YOURUNIQUEID_XXXX’ (For droplinemenu.com our database is called ‘frame_JOOMLA’), then click ‘Create Database’.
- Create a New User by entering 3-4 characters where it says ‘Username: YOURUNIQUEID_XXXX’ (For droplinemenu.com our username is ‘frame_JOOMLAUSER'), create a strong password, then click ‘Create User’.
- Add the USER to the DATABASE by selecting ‘User: YOURUNIQUEID_XXXX’ to ‘Database: YOURUNIQUEID_XXXX’ (For droplinemenu.com it is ‘User: frame_JOOMLAUSER’ to ‘Database: frame_JOOMLA’) and click ‘Add’. *Note - We just added a ‘1’ after our username.
- Check ‘All Privileges’ and click, ‘Make Changes’ (Not Pictured). WRITE DOWN YOUR DATABASE, USERNAME AND PASSWORD!
Step 7: Start the Joomla Install
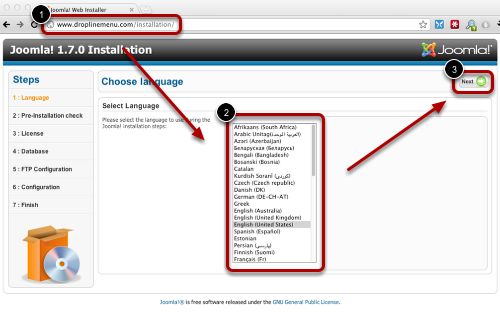
- Visit http://YOURDOMAIN.com/installation/ (For us it is http://droplinemenu.com/installation) to start the web-installation.
- Choose the preferred language.
- Click 'Next'.
Step 8: Joomla 'Pre-Installation Check'
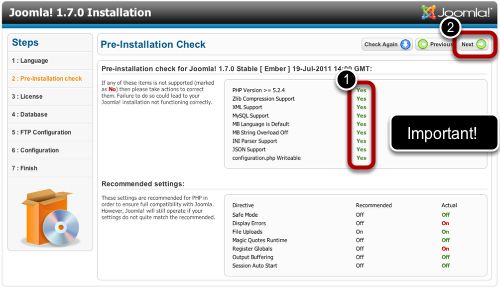
- Joomla Performs a pre-installation check. All areas need to say, ‘Yes’ in green ("Recommended Settings" are not required to be green, but they are recommended for a reason). If any of these settings say 'No' in red, consult Joomla.org’s help section for more information.
- Click ‘Next’.
Step 9: Joomla 'License'
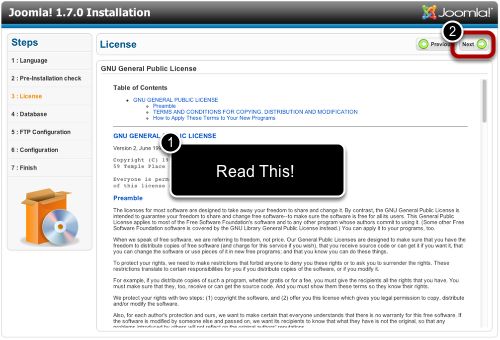
- Read and agree to Joomla's GNU Public License.
- Click ‘Next’.
Step 9: Joomla 'Database Configuration'
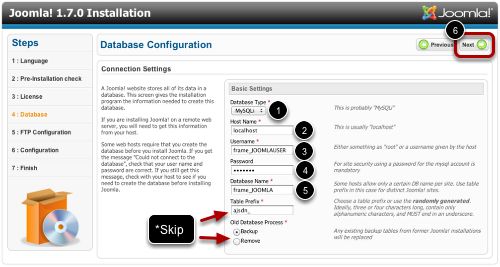
- MySQLi (Most common. It should work for you.)
- Host Name: localhost (Joomla defaults to this)
- Username: YOURUNIQUEID_XXXX (Ours is frame_JOOMLAUSER)
- Password: YOURPASSWORD (Ours is 123456)
- Database Name: YOURUNIQUEID_XXXX (Ours is frame_JOOMLA) *Note - Skip over ‘Table Prefix’ and/or ‘Old Database Process’ unless you know what you're doing.
- Click ‘Next’.
Step 10: Joomla 'FTP Config (Skip)'
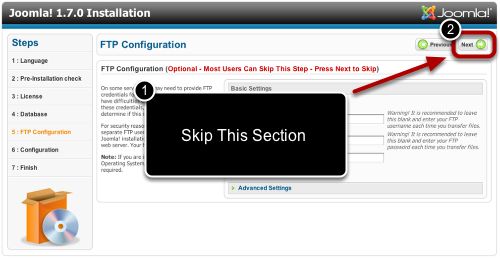
- Don't touch this section unless you know what to do (Refer to Joomla.org for more information).
- Click ‘Next’.
Step 11: Joomla 'Main Configuration'

- Enter the desired website name into ‘Site Name’ (Ours is Dropline Menu).
- Enter the email you plan to use with Joomla.
- Enter preferred Joomla login information.
- Choose if you want Sample Data
- Click ‘Next’
Step 12: Joomla 'Finish'
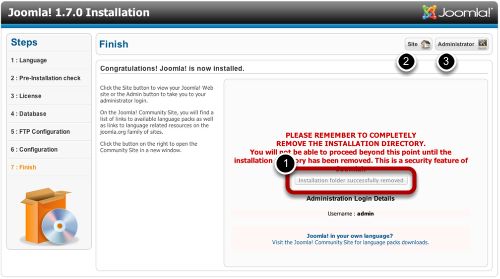
- Make sure to click ‘Remove Installation Folder’.
- Visit your site to see the installation
- Login to Joomla to start making you're website
Step 13: Verify Your New Site Displays
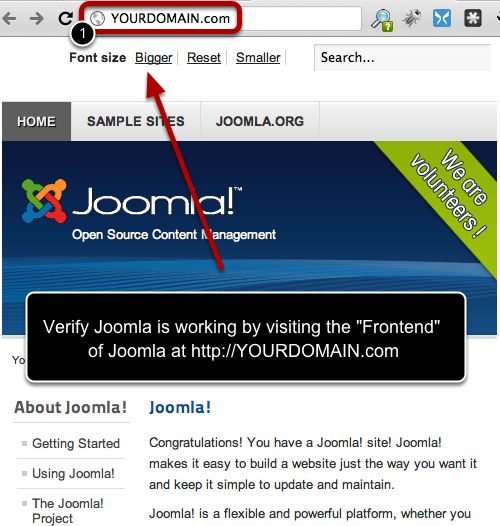
- Visit the "Frontend" of the site to make sure it is working properly by visiting it at YOURDOMAIN.COM ours was DROPLINEMENU.COM
Step 14: Congrats! You're Done!
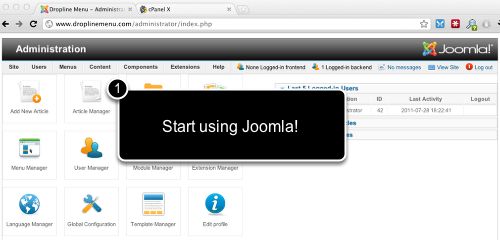
- Get started by visiting YOURDOMAIN.COM/ADMINISTRATOR for us it's DROPLINEMENU.COM/ADMINISTRATOR. Congratulations! You are ready to start using Joomla to develop your website! Just have your login information handy and you are set.