Install Joomla using HostGator Fantastico

HostGator is one of the best hosts around and Fantastico makes it very easy to install Joomla. This guide will walk your though the process step by step.

Steven Johnson
by | Posted: July 24, 2011 | Updated: June 27, 2013
 

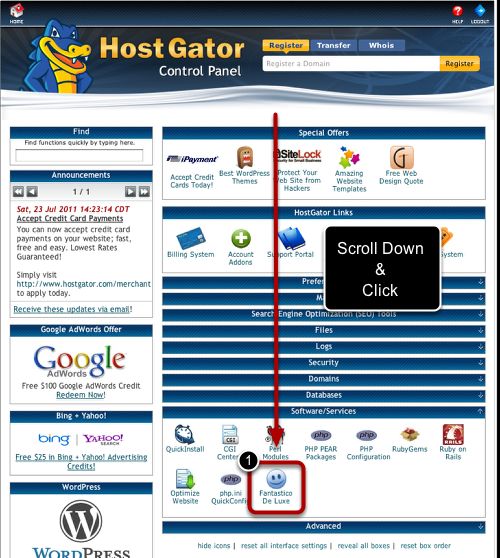
Using Fantastico with a Hostgator account is a very popular method of installing Joomla. Although, HostGator has come out with their own "QuickInstall" software installer, Fantastico is robust 3rd party option.

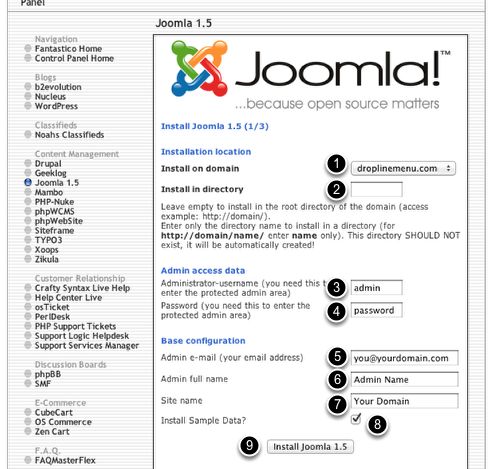
It's a very simple install, but be warned, you will not be able to choose the name of your database or database user name. All other options are available to change the same as any other Joomla installation.

Watch the video or follow the steps below:

" frameborder="0" width="560" height="345" allowfullscreen="true" style="display: block; margin-left: auto; margin-right: auto;">

Before you begin, you will need:

  1. A HostGator account (Sign up for a HostGator Account)
  2. cPanel Username / Password
  3. DNS configured (Domain name pointed to HostGator Server)
  4. Latest Joomla install package.

Step 1: Log into cPanel at Hostgator

Step_1_Log_into_cPanel_at_Hostgator.jpg
  1. Go to your cPanel http://www.YOURDOMAIN.com/cpanel or http://www.YOURDOMAIN.com:2082/
  2. Enter your cPanel username and password. *Note This information is available in the welcome email.

Step 2: Click Fantastico

Step_2_Click_Fantastico.jpg
  1. Click on 'Fantastico De Luxe' (The smiley face icon) under 'Software/Services' , to launch Fantastico.

Step 3: Enter the details of your new Joomla site

Step_3_Enter_the_details_of_your_new_Joomla_site.jpg
  1. Select the desired domain name. Most likely you will only have one option.
  2. *Optional - Enter the website directory (Only necessary if you are not installing to your root directory).
  3. Enter Joomla Admin Username (This information will be used to login to Joomla)
  4. Enter Joomla Admin Password
  5. Enter Admin Email (The Admin's Email. The Email that a lost password goes to. This can be changed after install).
  6. Enter Admin Username (The name displayed when logged in as admin. This can be changed after install).
  7. Enter Site Name (The name of your site. This can be changed after install).
  8. Install Sample Data if you are new to Joomla. Otherwise this step may cause you more problems than you want. It will populate Joomla with sample articles, modules, menu items, etc...
  9. Click the install button. *Note - This install method step skips the Standard Install steps which include the License Agreement and Database Configuration. To install using your own configured database or FTP options, it is necessary to follow the standard Joomla install guide.

Step 4: Verify your new site is up and running

Step_4_Verify_your_new_site_is_up_and_running.jpg
  1. After it’s installed, the next screen will show you the database username created automatically by Fantastico. (Not Pictured)
  2. Click 'Finish Installation. *Recommended - Send yourself all the created information by entering in your email and clicking “Send E-mail”. (Not Pictured)
  3. Visit YOURSITE.com (For us, it is www.droplinemenu.com) to see make sure Joomla has installed successfully.

Step 5: Congrats! You're Done!

Step_5_Congrats__You_re_Done_.jpg
  1. Login to Joomla using the admin username and password you created. (Not Pictured)
  2. Once in the administration area, start building your Joomla site!
 Visit HostGator    Read Review  
Steven Johnson

Steven is a Joomla web developer and worked with Joomla since the Mambo days. He has built websites for startup businesses all the way to for Fortune 500 companies. A graduate of Georgia Tech in Chemical Engineering, he now happily spends his time building websites and reviewing all types of technology.